CKL is a multi-disciplinary land development consultancy combining planning, surveying, civil engineering, transportation engineering, and environmental engineering expertise.
We are often asked by property investors “How can I maximise my investment and achieve a greater return on my investment?”
To help you understand the development options that may exist for you and to detail the development process itself, we recently wrote an article for the Waikato Property Investors Association (WPIA) Newsletter.
Keep in mind that every person has a different goal when it comes to property investment and development, and the property itself may have certain limitations placed on it in terms of size, resource consent, and the environment.
The information provided here is general in nature. If you have specific questions, or would like to explore your options in greater detail, why not come in for an obligation-free chat?
Property development is governed by the relevant District Plan for the area. The District Plan sets out the type of development that can take place across the district, including the minimum lot size, housing density, land use restrictions, and environmental considerations (e.g. stormwater, flood pathways, ecologically sensitive wetlands).
CKL prides itself on knowing the District Plans inside and out, so our team members are able to provide advice on the best development opportunities to help you achieve a strong return on your investment.
The process for a residential property development can be described in 9 key stages:
Property Development Process:
- Assessment and feasibility
- Identify concerns and constraints
- Investigate development options
- Initial cost estimations
- Resource Consent
- Survey and civil engineering work
- Construction
- Sign off and Council approvals
- Title granted
1. Assessment and feasibility
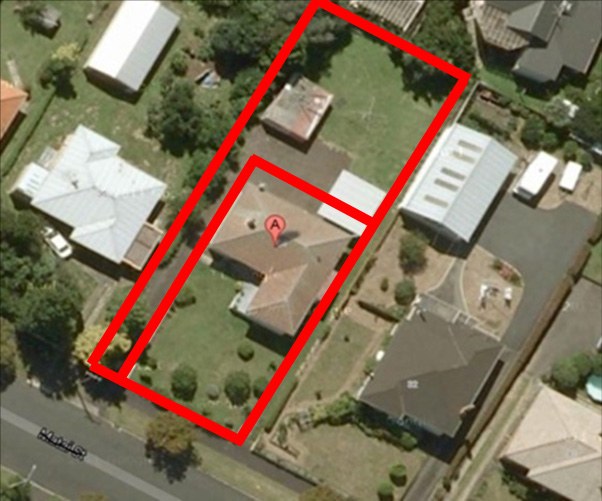
If you own a free-standing residential investment property in Hamilton for example, and are considering developing it, the journey we would take you on usually starts with an initial assessment of your property to understand the feasibility of development.
- At the outset, there are a few options for you:
- Subdivide to create an additional Residential Lot;
- Create an Ancillary Residential Unit; or
- Create a Duplex residential dwelling (add on to existing dwelling or demolish/remove the existing dwelling and rebuild)
Depending on the lot size, and the position of access and services, a subdivision to create a separate lot may be worth considering. The standard lot size for a fee-simple subdivision is around 400 – 450m2. If the lot is at the rear of a section a 3.6m width access way is required.
If subdivision is not for you, but you are wanting to create additional living space – perhaps a granny flat or a unit for your adult child - you may have the option to create an ancillary residential unit if your lot size is more than 600m2 and zoning allows for this activity. This dwelling can be detached or attached to the main residence and must include a kitchen, bathroom, bedroom, living space and laundry facilities and outdoor living space (can be a shared space). The common floor area is 60m2 excluding a garage.
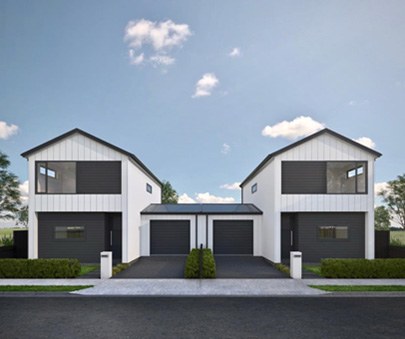
As a result of changes to the Hamilton District Plan in 2014, duplex provisions were introduced, resulting in a marked increase in this type of development. Townhouses, flats and units has increased from 15% in 2010 to 50% in 2019 which reflects a preference from developers to build townhouses and duplex homes. A duplex is best described as a residential building comprising two attached units, each of approximately 250m2. The units share a common wall, usually a garage wall and they can be on one title or subdivided to two titles.
If you are ready to remove the existing dwelling and keen to undertake a new build, duplex living allows for higher density living, whilst still maintaining privacy and a sense of open space. A duplex is an effective way to utilise a section.
Duplexes can also be potentially created by adding onto an existing dwelling and this works for corner sections and wide sites where you don’t have to worry about shared access.
2. Identify concerns and constraints
At this point in the process, our team will identify issues which may create hurdles for you along the development pathway. These may be accessibility, the position of services, stormwater, geotechnical issues, or District Planning requirements. We sit down with you and explain these and look at management and mitigation strategies.
3. Investigate development options
After considering all the factors associated with your property, our team will present you with the most cost effective and creative development options. We detail each of these options for you so you fully understand what is involved and it is at this point that you have a decision to make. Which one will you choose?
4. Initial cost estimation
Once a design has been selected, our team will put pen to paper and provide you with cost estimates for the project. Every project is different and there are a range of variables but to give you a ballpark figure for a fee simple subdivision of a 900m2 section, you would need to be prepared to spend approximately $15,000 + GST to get to the consent stage in the development process. This would likely cover planning, geotechnical engineering services, and council fees. Add to this any flood modelling, surveying and engineering costs, build costs, and the cost of laying new accessways.
5. Resource consent
Our team members are highly experienced in the preparation of resource consent applications. We gather together all the relevant information required for the type of application and lodge this with council on your behalf. Response times vary, but most residential developments (fee simple subdivisions) are granted within 4 to 8 weeks.
6. Survey and civil engineering
Once resource consent is granted, our team of civil engineers and surveyors move onto the vacant site to conduct any work in compliance with the conditions of consent. If the site has a dwelling on it, we will work with your builders to comply with subdivision and building consents. We have a strong network of local building contractors and are happy to provide you with recommendations should you need this.
7. Construction
At this stage in the development process you will start to see the site change and buildings start to take shape. This can be the most exciting part of the whole process as you can finally see the form of the new dwelling and imagine the final house in its surroundings. CKL can project manage the development from start to finish, including contract management of the various tradespeople necessary for the build. Build times vary greatly and are also heavily dependent on weather. It is worth remembering that in New Zealand our ‘construction season’ is usually October through to May/June.
8. Sign off and Council approvals
As the build nears completion, your CKL project manager will keep you updated on all the required inspections and approvals in order to ensure your development is signed off by Council.
9. Title granted
With everything in order, and the build completed, the final step in the process is the granting of a Title, this allows the owner to effectively take ownership of the property and move in!
If you are wondering how you can unlock the development potential of your property, give us a call or email us to set up an appointment and come in for an obligation-free discussion.